
Dear “It’s About People 2026” Conference participants,
We are excited to deliver this conference between March 13–18, 2026. The instructions for the conference presenters at the “It’s About People 2026” are described below.
We strongly recommend the following protocol for each panel:
- Update to the latest version of the Zoom desktop client/mobile application on your device.
- Read the ZOOM Event overview instructions and essential checkpoints for attending a conference in ZOOM.
- Our technical team will invite you to the rehearsal sessions before the event.
- On the day of your presentation, please log in with a unique Speaker access link that you received in your mail (subject: “Event Organizer invited you to be a speaker …”) at least 30 minutes before your schedule (our technical team will assign you in a ZOOM session backstage).
- At the start of your panel, the Chair/Moderator will greet all the participants, introduce the presenters, and announce each presentation just before the presentation. The participants will have the opportunity to ask questions.
We look forward to our discussions and turning this conference into a great success.
Prof. Dr Ludvik Toplak
Basic information
Speakers (Panelists) are full participants in the meeting. They can view and send video, screen share, annotate, etc. The host will give the presenter’s panelist rights before each session.
Attendees are view-only participants who can be unmuted if the host chooses. The host controls their view of the webinar. They can interact with the host and the panelists through the Q&A and the chat. Attendees should also turn off their cameras and microphones during presentations to avoid unnecessary interference or background noise.
Testing speakers and audio before joining a meeting
If you haven’t enabled the setting to automatically join by computer audio, you can test your speaker and microphone before entering a meeting:
Step 1: After joining a meeting, click Test Speaker and Microphone.
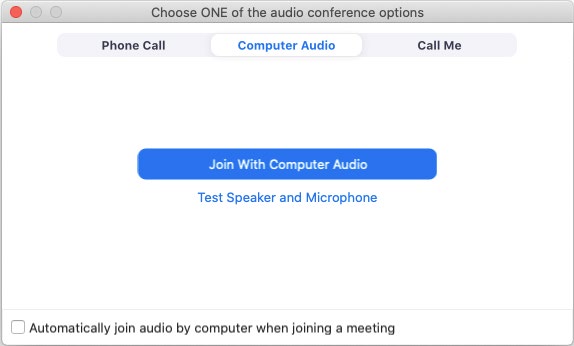
Step 2: The meeting will display a pop-up window to test your speakers. If you don’t hear the ringtone, use the drop-down menu or click No to switch speakers until you hear the ringtone. Click Yes to continue to the microphone test.
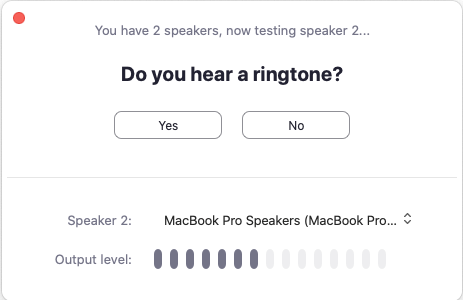
Step 3: If you don’t hear an audio replay, use the drop-down menu or click No to switch microphones until you hear the reply. Click Yes when you hear the replay.
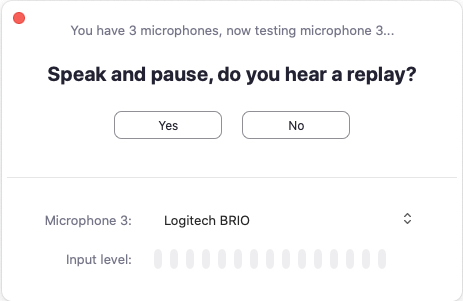
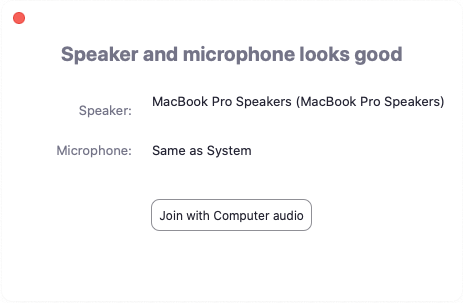
Step 4: Click Join with Computer Audio to exit the speaker and microphone test.
How to change your name on Zoom
All participants in the conference should use their full name and affiliation (e.g., John Best, Alma Mater Europaea) during the conference. Set your name and surname when registering for the conference. If you want to change it during the conference:
- Step 1: In a meeting, click Participants at the bottom of your screen in the calling bar.
- Step 2: Hover the mouse pointer above your name until you see the option to select More.
- Step 3: Once you see it, click on it and select Rename.
- Step 4: Enter your desired name in the text field and click OK to confirm your selection.
Sharing your screen
During presentations, the presenter will turn on sharing your screen so that other conference attendees will see the presentation. There is a Share Screen button on the Zoom toolbar.

While in a meeting, you can share the following content:
- Entire desktop or phone screen
- A specific application
- A portion of your screen
- Whiteboard
- Audio from your speaker
- Video from secondary camera
- iPhone/iPad screen
Note: The host can prevent participants from accessing screen share. For Free/Basic accounts, screen sharing is set to Only Host by default.
Step 1: Click the Share Screen button located in your meeting controls.
Note on using the Zoom Client and Zoom Rooms with macOS: Due to increased security and permissions with Mac OS 10.14 Mojave and 10.15 Catalina, you will be prompted to authorize the Zoom Desktop Client and Zoom Rooms to use the microphone, camera, and (on Mac OS 10.15 Catalina) screen recording. Read more on the following link.
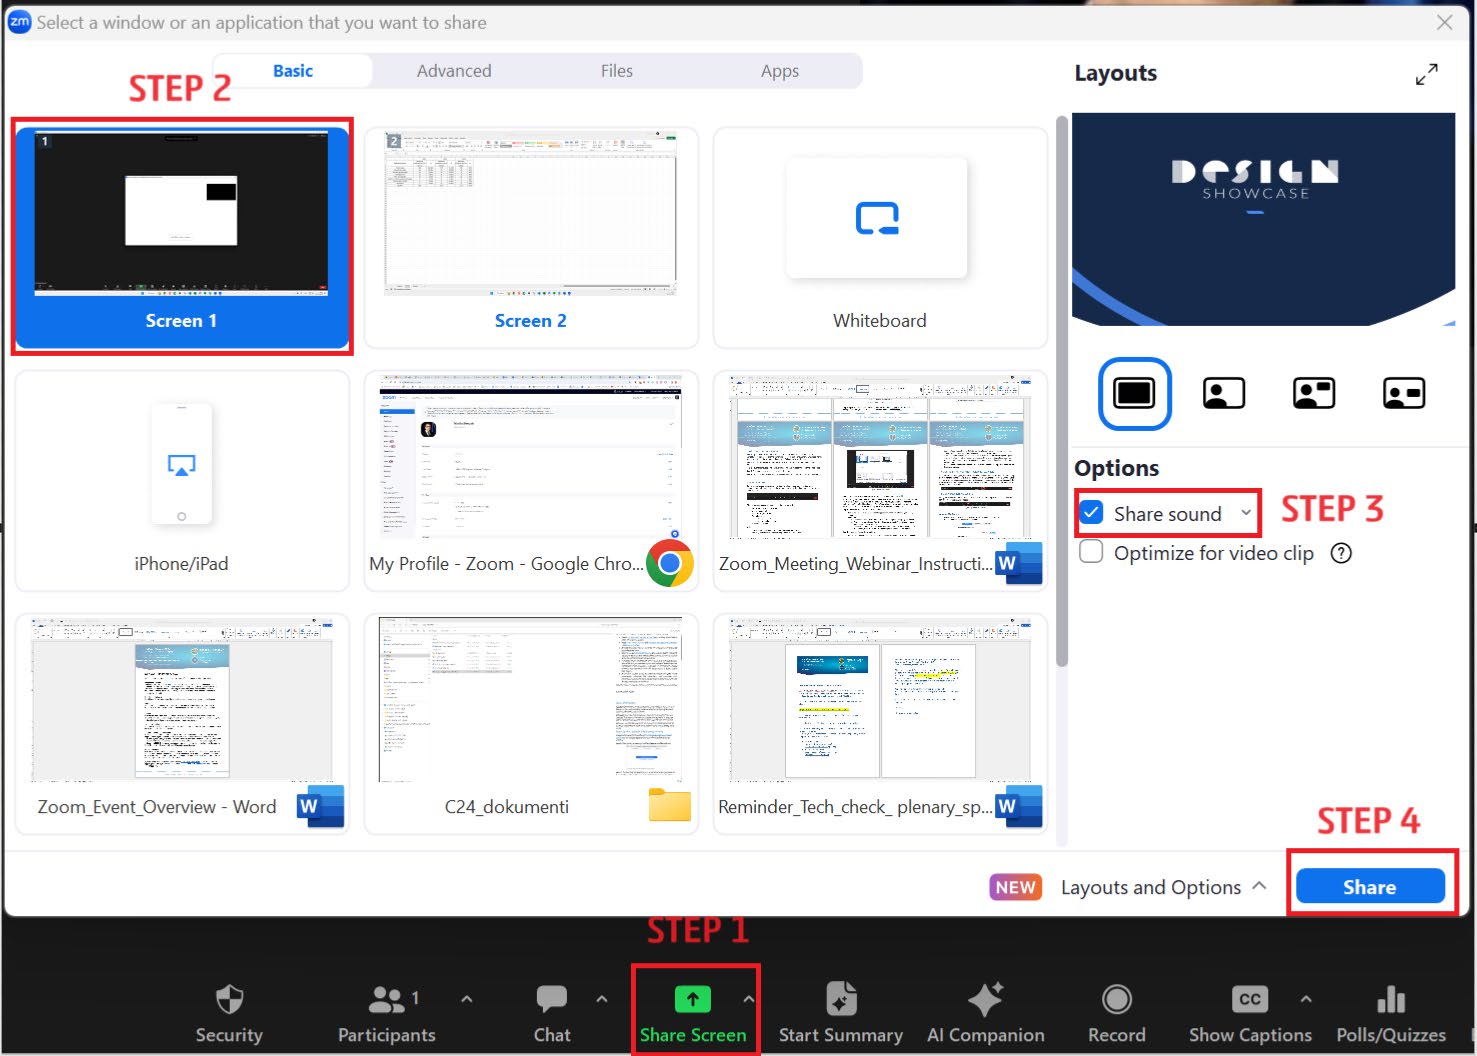
Step 2: Select one of these screen share options:
- Basic: Share your entire desktop, specific application window, whiteboard, or iPhone/iPad screen.
- Advanced:
- A Portion of Screen: Share a portion of your screen represented by a green border.
- Music or Computer Sound Only: Only share your computer’s audio (your selected speaker in your audio settings).
- Content from 2nd Camera: Share a secondary camera connected to your computer; for example, a document camera or the integrated camera on your laptop.
Step 3: (Optional) Enable these features:
- Share Computer Sound: If you check this option, any sound played by your computer will be shared in the meeting.
- Optimize for full-screen video clip: Check this if you will be sharing a video clip in full-screen mode. Please do not check this otherwise, as it may cause the shared screen to be blurry.
Step 4: Click Share.
- Zoom will automatically switch to full screen to optimize the shared screen view. Click Exit Full Screen in the top-right corner or press the Esc key to exit full-screen.
- To turn off the automatic full screen when viewing a shared screen, turn off this option in your desktop client settings: Enter full screen automatically when a participant shares a screen.
- If you selected Portion of Screen, customize the screen portion by dragging or resizing the green border.
- If you selected Content from the 2nd Camera, click Switch Camera in the top-left corner to switch the shared camera.
The Question & Answer (Q&A) feature for webinars
The Question & Answer (Q&A) feature for webinars allows attendees to ask questions during the webinar and for the panelists, co-hosts and hosts to answer their questions. At the end of each set of presentations, the moderator will address the questions and allow the panelists to answer them. Attendees will then be given the right to turn on their microphone for further discussion.

Managing Q&A during a webinar
During the videoconference, attendees can ask questions via the Q&A (Questions and Answers) feature.

Answering Q&A questions
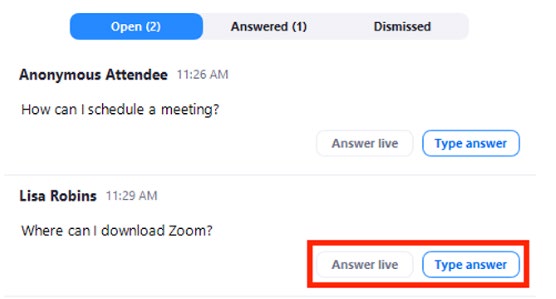
- As the host, co-host, or panelist, click Q&A in the webinar controls.
- Find the question you would like to answer.
- Click Answer Live to answer the question out loud during the webinar.
- Click Type Answer to type out your answer for the attendee. Type your answer and click Send. (Optional): Check Answer Privately before clicking send if you want to answer to the attendee only.
Dismissing questions
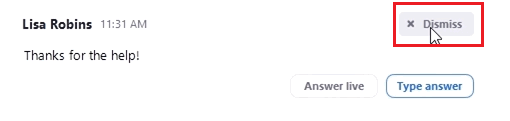
- As the host, co-host, or panelist, click Q&A in the webinar controls.
- Hover over the question that you would like to dismiss and click Dismiss.
Reopening dismissed questions
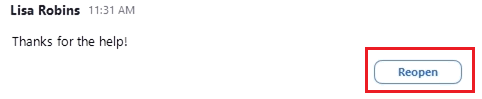
- As the host, co-host, or panelist, click Q&A in the webinar controls.
- Click the Dismissed tab.
- Find the question you would like to reopen and click Reopen Question.
Raising your hand in a webinar
The raise hand feature in the webinar allows attendees to raise their hands to indicate that they need something from the host or panelists. As a host, inform your participants how you would like to use this feature at the webinar’s start. For example, many webinar hosts use this feature to know if an attendee has a question and would like to be unmuted to speak.
- Click Raise Hand in the webinar controls. The host will be notified that you’ve raised your hand.
- Click Lower Hand to lower it if needed.
Note: On Windows you can also use the Alt+Y keyboard shortcut to raise or lower your hand; on Mac, Option+Y.

Managing raised hands as a host or panelist
As the host or a panelist, you will be notified when an attendee raises their hand. You can see who has their hands raised at any time by viewing the participants list:
- Step 1: Click Participants in the meeting controls.
- Step 2: Click the Attendees tab.
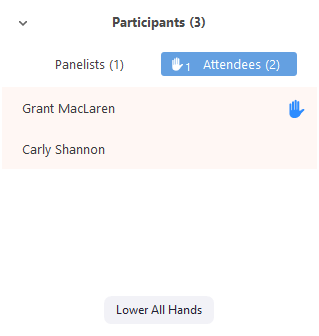
Note: Participants are displayed in the following order: participants who are allowed to talk; participants with their hands raised (those who raised their hands first are displayed at the top); participants without their hands raised.
Step 3: Hover over a participant with their hand raised for these options:
- Allow to talk: Allow the participant to talk and unmute their mic. The participant will receive a prompt to confirm if they want to unmute or stay muted. If you already allowed a participant to talk but they decided to stay muted, click Unmute to prompt them to unmute their mic.
- Disable talking: If you allowed a participant to talk, this will revoke the participant’s ability to talk. The participant will stay muted.
- Lower Hand: Lower the participant’s hand. Their position in the participants list will move down after the participants with their hand raised.
Step 4: Click Lower All Hands at the bottom of the participants list to lower all raised hands.
Need help?
For more information about Zoom Webinar visit the Zoom Support Center. If you have additional questions, please visit the ZOOM Events help centre. If you need IT remote support, please install/run the AnyDesk application and send your ID to support@almamater.si or call +386 59 335 079.